Sharing snapshots of life with:
skip to main |
skip to sidebar
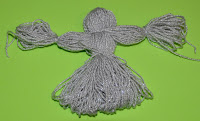
 I tend to forget that not everyone knows how to make these little people, since I learned as a child too. When we made "witch" yarn dolls (see photo below) for our mother daughter book club, I was reminded that not only kids...but some adults have never learned to make these little treasures. And that both can have such a good time with them because they're "do-able" even for non-crafty types.
Find a small piece of cardboard or plastic (the height you wrap around will determine the height of your doll), and begin loosely wrapping yarn around it. For this particular angel, I wrapped 150 times around. You can do less for a "Biggest Loser" version of an angel...I just like mine "plump."
 Slide a short length of yarn underneath one end of the wound strands and tie it to secure. This will be the top of the doll's head.
Gently slide the yarn off of the cardboard.
Hold the "head end" of the lengths, and tie another short piece around where you want the neck to be. Figure this out by how large, visually, you want your "head" to be. (Or rather, the angel's head...)
Separate out a few strands on each side to become the arms, and tie at the wrists. Then trim the loops at the ends of the arms to create the pom poms for the hands.
Next, tie a waist for your little figure, and cut open the bottom loops to form the skirt.
Need hair? You can make a little wig in the same manner. Wrap the yarn around a narrow strip of cardboard, and knot on one end. Slide the loops off and cut open the loops at the opposite end from the tie.
 Insert a little yarn underneath the tie at the top of your figure's head, and use it to tie on the wig. Then "style" as desired.

The wings are simply two pipe cleaners bent into wing form and tied on the back.
You can always make her a bit fancier with a ribbon belt, googly or stitched eyes, or dip the bottom edge of her skirt in glue and glitter. We used to add pipe cleaner halos when we were little, too.
As promised, here's the witch version we did for Halloween.
One skein of yarn, a pair of scissors and cardboard can make quite a few of these and keep the little ones crafting for a while.

Tuesday, November 9, 2010
Gift Idea Easy Enough for Kids to Make
Since my Brownie troop is working on their sewing try-it and the holidays are approaching, I thought I would have them make something warm and cozy to keep or give as a gift. Fleece scarves! And luckily, many of the local fabric stores have been having sales on fleece...just watch for the ads.
After reviewing scissor safety with the kids have them make cuts on both sides of the scarf, ALMOST to the center line of stitching. Remind them not to snip THROUGH the stitching. My group cut little strips about the width of one or two of their fingers and they looked great.
It takes just a bit of time (about 30 minutes if you're singing and telling jokes during the process) and patience, but they loved the results (and got very creative with different ways to wear them!).

Supplies:
2 colors of fleece, 2 yards each (this was enough to make about 11 scarves)
thread
sharp scissors
sewing machine
Cut the fleece in 6 inch strips, the full width of the fabric. Pair and layer one of each color, and sew a single line down the center of each pair. It's already starting to look cozy!After reviewing scissor safety with the kids have them make cuts on both sides of the scarf, ALMOST to the center line of stitching. Remind them not to snip THROUGH the stitching. My group cut little strips about the width of one or two of their fingers and they looked great.
It takes just a bit of time (about 30 minutes if you're singing and telling jokes during the process) and patience, but they loved the results (and got very creative with different ways to wear them!).
10 girls + 20 busy hands=10 great scarves and a happy leader!
Join in the fun at:

Labels:
children,
Christmas,
color craft,
fleece,
gift,
Girl Scouts,
kids,
scarf
Monday, November 8, 2010
Kids' "Primitive" Angel Yarn Doll Ornament
My daughter and I had a great time yesterday spending the afternoon make yarn dolls and yarn doll ornaments (her idea). This is such a great craft project for kids, and can be used as small gifts, ornaments or package decorations.
 I tend to forget that not everyone knows how to make these little people, since I learned as a child too. When we made "witch" yarn dolls (see photo below) for our mother daughter book club, I was reminded that not only kids...but some adults have never learned to make these little treasures. And that both can have such a good time with them because they're "do-able" even for non-crafty types.
So here goes:
Find a small piece of cardboard or plastic (the height you wrap around will determine the height of your doll), and begin loosely wrapping yarn around it. For this particular angel, I wrapped 150 times around. You can do less for a "Biggest Loser" version of an angel...I just like mine "plump."
 Slide a short length of yarn underneath one end of the wound strands and tie it to secure. This will be the top of the doll's head.
Gently slide the yarn off of the cardboard.
Hold the "head end" of the lengths, and tie another short piece around where you want the neck to be. Figure this out by how large, visually, you want your "head" to be. (Or rather, the angel's head...)
Separate out a few strands on each side to become the arms, and tie at the wrists. Then trim the loops at the ends of the arms to create the pom poms for the hands.
Next, tie a waist for your little figure, and cut open the bottom loops to form the skirt.
Need hair? You can make a little wig in the same manner. Wrap the yarn around a narrow strip of cardboard, and knot on one end. Slide the loops off and cut open the loops at the opposite end from the tie.
 Insert a little yarn underneath the tie at the top of your figure's head, and use it to tie on the wig. Then "style" as desired.
The wings are simply two pipe cleaners bent into wing form and tied on the back.
You can always make her a bit fancier with a ribbon belt, googly or stitched eyes, or dip the bottom edge of her skirt in glue and glitter. We used to add pipe cleaner halos when we were little, too.
As promised, here's the witch version we did for Halloween.
One skein of yarn, a pair of scissors and cardboard can make quite a few of these and keep the little ones crafting for a while.
I'm linking up with the fun at:

Labels:
Christmas,
color craft,
Halloween,
kids,
ornament,
paper doll,
tradition,
yarn
Subscribe to:
Posts (Atom)


